IMPORTANT: Be sure to use a cake pan that’s at least 2 inches deep! Before baking, the batter should not fill the pan more than halfway.
I was bored (read: hungry, ravenous, craving sugar) yesterday and I had a bunch of strawberries in my fridge. I also had a laundry room filled with dirty laundry, a sink full of breakfast dishes, and a major ax to grind.
So I decided to bake. It’s what I do when I have an ax to grind.
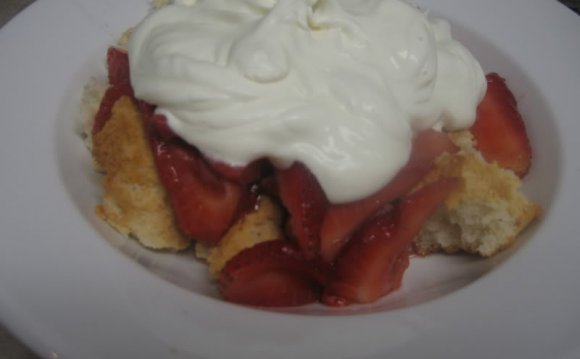
I came *this close* to making strawberry shortcake—I had plenty of heavy cream in my fridge as well, which I could easily have sweetened, whipped, and plopped over the top of sweet biscuits and syrupy strawberries. Been there, done that…dozens of times.
But yesterday, I wanted to be different.
So I created something else. I created…a cake. It’s a cross between strawberry shortcake and strawberry cake. And get this: I got really creative and decided to name it…Strawberry Shortcake Cake. I’m creative that way.
The Cast of Characters (for the cake): Unsalted Butter, Sugar, Eggs, Sour Cream, Vanilla, Baking Soda, Flour, Salt, and Cornstarch.
For the icing/topping: Fresh Strawberries, Unsalted Butter, Cream Cheese, Powdered Sugar, and Vanilla. And a dash of salt, too.
Begin by sifting together flour, salt, baking soda, and cornstarch. This cake is adapted from one of my favorite sponge cake recipes of all time. I knew it would be perfect for this cake—I’ll show you why later.
Sift the ingredients onto a sheet of waxed paper; that way, you can fold it up and carry it over to the mixer in a minute.
Throw the butter and sugar into the mixing bowl.
Cream it till it’s light and fluffy.
(Do you write till? Or do you write ’til? I wrote ’til till someone recently set me straight.)
(Or do you write until, like most literate people do?)
Never mind. Don’t answer that.
Add in the eggs one at a time, mixing gently after each addition.
Next, add the sour cream…
Mix together until smooth.
Now dump in the sifted ingredients…
And mix it just until ingredients are combined. I usually stop just short of it being totally combined so I can give it a stir or two with the rubber spatula.
You need an 8-inch cake pan. I decided to do 8-inch instead of 10-inch because it’s smaller and cuter.
Very unlike my bottom.
VERY generously spray the bottom and sides of the pan with cooking spray, which, let’s face it, is SO much easier than rubbing the inside of the pan with butter, then tapping flour all over it.
I praise the DAY I discovered cooking SPRAY.
That could be a jingle, a poem, or a rap, depending on your needs.
Pour the batter into the greased pan…
Then, with an offset spatula, get the surface as level as you can.
Then bake the cake at 350 degrees for 45 to 50 minutes, or until no longer jiggly. And please note: the cake tends to get pretty golden brown on the outside when it bakes…but it’s perfect inside. Here, I’ve inverted the baked cake onto a cooling rack and placed it by an open window (it was cool outside yesterday) so it’ll hurry up and cool down—it has to be completely cooled before I can ice it.
Meanwhile, stem and slice the strawberries. I love using the tip of a spoon to stem strawberries; that’s how my mom always did it.
Once they’re stemmed…
Slice them in half from top to bottom.
Throw the strawberry halves into a bowl…
Sprinkle the sugar over the top.
Then give ’em a little stir.
Now, let the strawberries sit for 30 minutes. They’ll begin to give off juice, which will mix with the sugar to form a nice syrupy liquid. Delish.
After 30 minutes, mash the strawberries on a plate with a fork.
Once they’re mashed (you can mash as much or as little as you’d like), sprinkle on a little more sugar. Let them sit for another 30 minutes to get nice and juicy and syrupy. (I halved the strawberries and mashed them on two separate plates.)
(And for you adventurous types: here’s where you could splash just a little bit of Grand Marnier over the strawberries. It’ll make the cake extra yum, and will cure your aches and pains.)
Once the cake is completely cooled, make the icing. Throw the cream cheese and unsalted butter into the mixing bowl…
Mix it together till light and fluffy.
Sift the powdered sugar and throw it in. Add the vanilla here, too, along with a dash of salt.
Beat the icing until it’s light and fluffy, about a minute on high. This is where the whisk attachment of your mixer comes into play—it really gets the air into the icing. (A hand mixer works just as well!)
Mmmm. Cream cheese icing. The stuff that dreams are made of.
Make sure the cake isn’t the least bit warm.
Then, with a long, serrated knife, slice the cake perfectly in half.
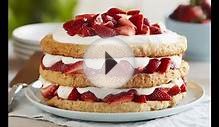
The texture of this cake is really something. Here’s why I decided to use it:
It’s substantial enough to hold up when you spread the strawberries over the top. Half the berries go on the bottom…
Be sure to pour all the sweet juices over the top. They’ll soak into the cake and make you a happier person.
Now, repeat with the other half the cake and the other half of the berries, then place both halves into the freezer for about five minutes. Go ahead and stick the icing into the freezer, too. This’ll cool everything down just a bit and help the icing process. (Just don’t let the icing stay in much longer than that; the butter will become firm very quickly.)
When you’re ready, place the bottom half onto a pretty cake plate or pedestal. I love this dadgum pedestal.
I got it on eBay, like, last century. Quite literally. Fenton Milk Glass. Totally kitschy, man.
Plop a little less than a third of the icing on top of the strawberries…
And spread it out, being careful not to disrupt the strawberries too much.
No need to be overly neat. The icing can hang over the sides a little.
Next, place the other strawberry-covered half on top.
Plop half of the remaining icing on top…
And spread it out evenly, being careful not to disrupt the strawberries too much.
*Important: at this stage, I stuck the cake back into the freezer for about 5 to 7 minutes before icing the rest of it. It’s a crazy habit of mine.
When you pull it out, begin to panic when you realize you’re losing daylight fast. Use the remaining icing to cover the sides of the cake.
Mmmm. Looking good!
If you get icing on the plate or pedestal, just use a damp paper towel or cloth to clean it right off. Marlboro Man always makes fun of me when I do this, especially when I’m serving the kids Spaghetti-O’s.
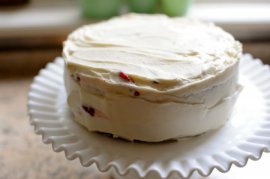
Well HELLO, my beautiful lover! It’s very nice to finally meet you face to face.
I think the cake looks nice the way it is—you can see hints of strawberries peeking through the icing, and it’s sort of natural and uncontrived. But if you wanted to, you could artfully arrange strawberry halves all over the top in any number of designs.
RELATED VIDEO


Share this Post
latest post
-
 Deep Dark Chocolate Cake recipe May 30, 2026
 -
 Easy Fresh Spring Rolls recipe May 10, 2026
 -
 Recipe for Cornbread Cake April 20, 2026
 -
 Pork Spring Rolls Recipes March 31, 2026
 -
 British fruit cake recipe March 11, 2026
 -
 Old Fashioned coconut Pie recipe February 19, 2026
 -
 Fruit Coffee cake recipe January 30, 2026
 -
 Ferrero Rocher Nutella Cupcakes recipe January 10, 2026